You don’t need professional equipment or a recording studio to create a decent recording of your tour – although if you want to use these, then great! Modern smartphones have excellent built-in microphones that will produce clear, professional-sounding recordings.
The simplest option is recording directly in the VoiceMap app, where we’ve integrated the recording step using your script. This feature is only available in the app, not desktop. It’s a new addition that we’re still perfecting, so we welcome your feedback on the forum.
Using the recorder #
The audio recorder is located in the Create section of the VoiceMap app. You’ll find this by tapping the microphone icon at the bottom of the screen.
You’ll see your tours are organized into three categories in the Create section: Production (tours you’re currently working on), Published (tours you’ve successfully published), and Dormant (tours you haven’t worked on in the past six months). Locate your tour in the Production section and select Record Sample.
The VoiceMap recorder makes things super simple by putting everything you need in one place:
- You’ll see your script right on the screen, so you can read along as you record
- At the same time, you can record your voice without switching between apps
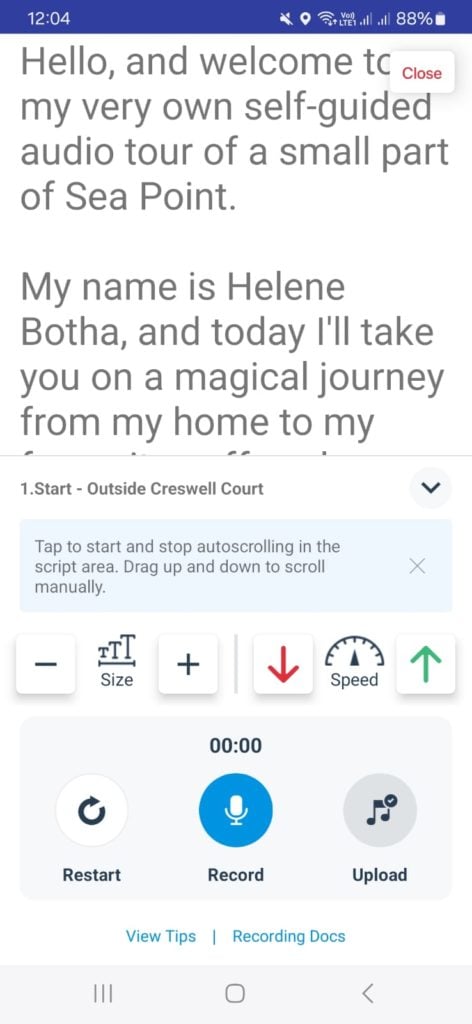
Everything happens right on your phone. Here are some of the features that help make the recording process as smooth as possible:
- Navigate the script easily by tapping the script area once to start auto-scrolling. Tap again to stop it. You can also scroll manually by dragging the script up and down.
- Customize the display by adjusting the text size and scrolling speed. Use the size controls to make text larger or smaller, and the speed arrows to control how fast the script moves.
- Take breaks when you need to. You can pause and resume your recording as many times as you like.
- Start from the beginning if you’re not happy with your recording by tapping the Restart button.
- Submit your recording to your editor when you’re ready by tapping the Upload button. After uploading, you can listen back to check how it sounds.
The recording process #
The recording workflow follows a sequential process where each step becomes available only after completing the previous one. Available steps appear in color, while unavailable steps remain greyed out.
Recording a sample #
Before recording your entire tour, you’ll first need to submit a sample recording and get feedback from your editor:
- Click on the red speaker icon next to Sample Required
- The script from your first location will appear in the prompter
- When you’re ready, tap Record and read the first minute of your script
- Once you’re done recording, tap Upload to save your recording
- Tap the blue playback icon to listen to your sample. If you’re not satisfied with your sample, tap on the red speaker icon to re-record it.
- If you’re happy with your sample, let your editor know, and they’ll listen to it
- You’ll receive a notification email and feedback from your editor once they’ve listened to your sample
Your editor might ask you to record a second sample if they do, they’ll provide feedback on how to improve the audio quality and delivery.
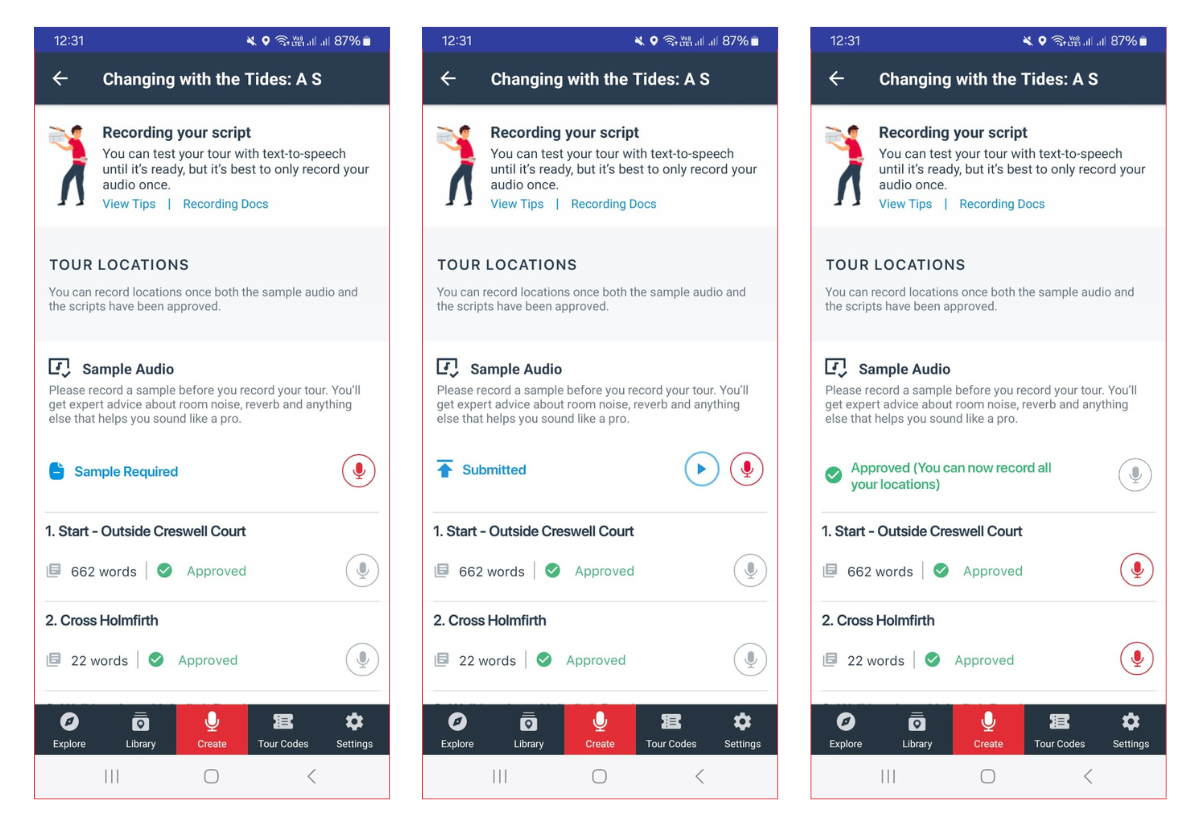
Recording your full tour #
Once your editor has approved your sample, you can begin recording audio for all your tour locations:
- The option to record (red microphone) will become available for all locations
- Follow the same recording process as with the sample for each location
- Tap on Upload to save the recording
- Tap the blue playback icon to listen to your audio and the red microphone to re-record it until you’re satisfied with the quality
- Continue until you’ve recorded all locations in your tour
- Please email your script editor and audio editor to let them know when you’re done recording your tour
Recording best practices #
Here is some of the feedback and ideas from publishers who have used the recorder
- Make sure to put your phone in Do not disturb mode when recording, to avoid alert sounds popping up while recording
Recording on your laptop or computer #
A smartphone is a simple and effective first choice. But it’s not the only option if you don’t own one. With some basic steps, you can easily set up recording on your laptop or computer.
For Windows, we recommend Audacity – it’s free, straightforward, and available for Mac too. You can view our Audacity tutorial here. If you’re a Mac user, you likely have GarageBand already installed, which is as simple as they come, and geared towards people with minimal recording experience.
Whichever method you choose, the instructions below will guide you through the process.
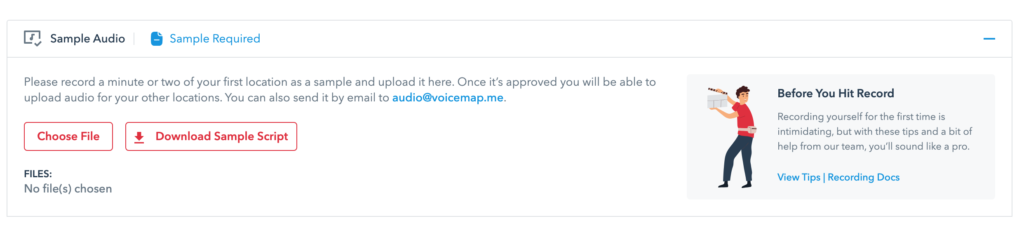
The Upload Audio tab #
If you’ve recorded your sample on your computer, you can upload the audio sample directly via the Upload Audio tab.
You can upload common audio formats such as mp3, WAV, AIFF, or M4A. You can also download a sample script of the tour’s first location to use when recording your sample.
Once uploaded, submit it to us, and we’ll get back to you. We’ll either reject the sample and reach out to you with feedback on how you can improve it, or approve the sample and reach out to you with the next steps for recording the full script. We’ll usually get back to you within a few days at most.
Remember that consistency in audio quality, pacing, and tone throughout your tour will create the best experience for your listeners. You’ll find our best recording tips in the next section.